Google recently released Google Tips. A great place to go for tips on Google products including Gmail, Drive, Sites, Chrome, Google+, YouTube, Maps, Search and other great Google products.
I have previously blogged about a few of the new changes to Google Drive. Click the Google Gooru link below for a recap. See the 11 Things You Need to Know About the Redesigned Google Drive.
NEW GOOGLE DRIVE TIP #7: Another new change with your Google Drive is your offline sync. To enable offline access, click the gear in the upper right corner, Then settings and select Offline. Your files will now be available offline immediately. Your Drive files and folders will sync as they are created.
What do Ctrl L or Command L do? They highlight the URL (address of web site). If you need to copy a link or want to delete the link, simply click Ctrl L (PC) or Command L (Mac). Ctrl L/Command L will only highlight the URL, it does not copy it.
If you want to copy the URL (after using Ctrl L/Command L), use Ctrl C to copy and the Ctrl V to paste.
Have you heard of Evernote Web? It is an app for your phone and computer to keep notes. I use Evernote on my phone to keep lists of certain information and reminders. From anything from what kind of cartridge my printer uses to the measurements of a window that needs replaced in my home. When I am on the go, I always have access to all my important lists and reminders. The Evernote web app syncs seamlessly with your computer and phone.
If you add the Evernote extension called Evernote Web Clipper, you can save web sites, articles, pictures, or anything you can find online right to your phone. Back to my window that needs replaced - I can go online and check out the store that has the window I want, "clip" all the information about the window and it is incorporated right to my phone. When I go to the store to check out the window, I have all the sales information, measurements and pictures of the window right at my finger tips.
I finally got my "new" Google Drive today. I have been able to experience it for over a week in my personal account and I have been patiently waiting for it to populate in my Google Apps for Education Account. Finally--it's here. Do you have it in your GAFE account? How do you know? Where can you find it?
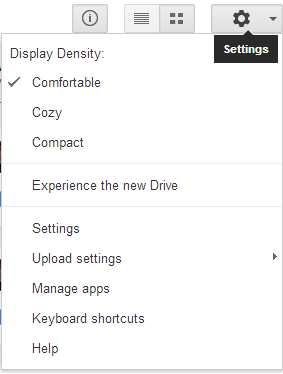
Open your Google Drive, go to settings in the top right corner (wheel/gear), drop the menu and you will see "Experience the new Drive".
Once you click "Experience the new Drive", you should get a quick tutorial with some great overviews and tips.
Just wanted to remind everyone while you are enjoying your summer break to check out Potts' Favorite Extensions and Apps. I have added a few new extensions under the subject of Reading and Writing.
I used Google images all the time. Google images is so easy to use and if you can't find the picture you want using Google images, then it isn't available. When using Google images, you can filter which images that are available freely for commercial or non commercial purposes right on your search results page.
Once at Images, click on Search tools
Then click on Usage rights
Click the drop down menu for Usage rights. That menu offers five choices: Not filtered by license, Labeled for reuse, Labeled for commercial reuse, Labeled for reuse with modification, and Labeled for commercial reuse with modification. Select the option you wish to use, and the page refreshes to include only those images.
What do these five options mean?
Not filtered by license - This means that you haven't yet selected a type of filter to organize the photos by. Basically, you are looking at all types of photos with all types of usage rights. This is how you can get in trouble when selecting images that are really authorized for use. To find a photo that you can legally use, make sure to select something other than the "not filtered by license" option.
Labeled for reuse for modification - This means that you can use the photo commercially or non commercially as long as you modify it.
Labeled for reuse - Users can reuse the photo commercially or non commercially as is. No modification is needed.
Labeled for non commercial reuse with modification - This means that you can use the photo in a non commercial way as long as you modify the image. Non commercial means that you cannot have the photo on products or be part of a business.
Labeled for non commercial reuse - This means that you can use the photo in a non commercial manner as is. No modification is necessary.
NEW GOOGLE DRIVE TIP #6: As I stated in a previous blog post, I like to keep my Drive organized with folders. Another way to organize your files and remember the important files is to Star those files. Oh-but that has changed too. In the old Google Drive, you could simply click the star beside the file and it was starred. Not anymore. With the new Google Drive it requires a new action. There are a couple of ways to star a file. 1. My Favorite - Use the shortcut key combination of "s".
Click the file to highlight
Click "s"
A message will appear at the top of your screen telling you that the file has been starred
To remove a file just press "s" again and the file will no longer be starred. A message will appear at the top of your screen telling you the star has been removed
2. Use the More actions menu
Click the file to highlight
Click the More actions menu - it's the three dots button at the top right
Select Add Star
3. From within an open file
Open the file you want to star
Click the star icon to the right of the file name and the star is applied
Probably the biggest change in the new Google Drive when it comes to starring files is that you don't see the star in the Drive list or grid list as you did in the old Google Drive. To see the files you have starred, you need to see the Starred view on the left side of your Drive.
NEW GOOGLE DRIVE TIP #5: Hopefully you have been reading my posts about the new Google Drive. I'm up to Tip #5. Today's Tip #5 asks, Where's my shared folder? In the old Google Drive, you could see the "Shared" folder on the left side.
In the new Google Drive, all files "shared" with you can now be found in the Incoming View.
To move the "shared" files to your drive, select the file you want to move to your drive and click Add to My Drive.
NEW GOOGLE DRIVE TIP #4: I always keep my Google Drive very organized. I have folders named and color code the folders. Lots of my docs relate to more than one topic, so I like to put the file in more than one folder. With the old Google Drive, it seemed very easy--simply hold down the Shift key and click on the folders you wanted. However, change has happened. I am not sure that I like the change. Seems like you have more clicks and I feel like it will take some time to get used to the steps and shortcut keys needed to move a file to more than one folder. To move a Google Doc into one folder do this:
Click once on the file
Use the More icon on the toolbar at the right side. It looks like 3 dots. Clicking the "Move to" icon gives you the option to move the file into a folder
Move the file to the folder you want the doc in
Go to the file in which you just moved the doc into
Hold down the "Shift Z" key combination and the "Add To" option will appear (instead of "Move")
Now select the additional folder that you want the folder to be in
NEW GOOGLE DRIVE TIP #3: You already know that Google Drive is a great way to connect, collaborate and share documents. With the new Google Drive, it is now even easier to share documents. When you open a Google document, you will see a link icon on the toolbar at the right. Clicking the link icon makes it even easier to share documents than ever before. You can now share the document or click Control C to copy the link. Then you can press Control V and paste the link into an email, hangout, chat, Google+ or any other place you want to share and collaborate with others.
In the new Google Drive the row spacing between files is larger than it used to be. What does this mean? It means that you can see fewer files in your drive at a time.
How do you solve this and make it so that you can see more files?
Strike the "q" key and then strike the "q" key again. Doing this will reduce the spacing between the rows and allow you to see more files on the screen.
Have you been to your Google Drive and checked out all the new features yet? As well as looking different, there are some changes.
NEW GOOGLE DRIVE TIP #1:
There used to be a check box feature beside your Google files. When you wanted to select multiple documents, you simply put a check mark next to the files you wanted to select in order to move or delete them. That check box is no longer available. The picture below shows the OLD drive view with the files selected that I want to move.
With the new Drive, hold down the Control key (PC) or Command key (Mac), as you select multiple files.
If you hold down the Shift key while you select another file, all of the files in between those two files will also be selected.
On June 25, I blogged about the coming of the new Google Drive. If you missed that post, check out this video.
The new Google Drive is now rolling out to a Drive near you. In the next few days, I will blog about some of the new changes. Here is a look at my new drive in the LIST view.
View of files in GRID view.
Stay tuned for more information on your NEW GOOGLE DRIVE!
Did you know that when you create a document in Google Drive that all changes are automatically saved? And did you know that after all changes have been saved in Drive that it becomes a hyperlink that will launch the revision history when you click on "All changes saved in Drive"?
After clicking on "All changes saved in Drive", the Revision History will appear on the right side of the screen. The Revision History lets you see who made what changes and when those changes were made. It also allows you to revert back to an older version of the document.
Check out this web site for 5 Ways to Get an "A" Using Google Docs. Also see the links on the right side of the web page for more info on using Google Docs.
Well, the 4th of July has come and gone and that means time will fly by and you will be back in front of your students in no time! Have you already started thinking about how you will use technology in your classes this year? I am sure that you have given it some thought. To help you think about lessons and using technology in your classes, I suggest that you check out Google in Education Lesson Plan web site. On this web site, you can find all kinds of lesson plans and ideas for class. Check it out.
As many of you know, I have a doc that I continually update new Chrome extensions and apps called Potts' Favorite Extensions and Apps. I added a new web site to the doc that should help you find extensions and apps for those students who have disabilities. The web site is called Chrome Toolbox.
If you want some hands on with extensions and apps, don't forget to sign up for the Google sessions offered throughout the summer.
Just a reminder that the Google Apps for Education professional development sessions begin tomorrow at the Mid-East CTC-Zanesville Campus. All sessions will be held in the Adult Building in Room 5040. There will be AM (8:30-11:30) and PM (12:30-3:30) sessions. Remember to send me an email at lpotts@mideastctc.org to register a session. There must be 4 participants for the sessions to be held.
Check out the 2014 Google Summer PD doc and check the Everything Google calendar located on the left of this blog.
I have blogged a couple of times about Snagit. It is a great screen capture and screen casting extension that works in Google Chrome. This is a really good video on how to use Snagit. I have been using Snagit in many different ways as I blog along. I like it and suggest that you check it out.
In my last blog, I described how to create and color a new Gmail label. I hope you have had a chance to check it out and give it a try. Now that you created that label, how do you move those emails to the new label?
One way to move the email to the label is to go to the toolbar above your emails. Click the folder and find your "My New Label" folder. The email is moved to that label. If you have further correspondence within this email, it will appear in your inbox with the "My New Label" folder to the side of the email. If you colored the label, it will appear colored.
You can also drag the email to the left side of the window and simply drop the email into the "My New Label".
You can also FILTER these emails. What does FILTER mean? When you filter emails, you are setting up an automatic place for certain (filtered) emails to go when you receive them. Each time I get an email that relates to "My New Label" I want it to "go" to that label. Click on the MORE button on the toolbar, and click Filter messages like these.
The box below will appear. First make sure that the email is from: the correct person. You can set up more filtering helpers by filling in any of the other boxes. Then click Create filter with this search and a another box will open.
Check out the short video on how to create the filter.
Is your Gmail organized? One way to organize your Gmail life is to create labels. Creating labels (like folders) allows you to put important emails into specific categories. Do you get lots of emails about upcoming events at school, student learning objectives, OTES, club events, then make some labels and start getting your Gmail self organized.
Creating a new label is easy. Look at the bottom left of your open Gmail. You may need to click MORE, but below MORE you will see Create Label. Click Create Label.
A box will appear where you can name your label. I will name my label - MY NEW LABEL.
Once you create and name the new label, it will appear with its new name. Now go one step further and color the label. Right click the "MY NEW LABEL" and click color label.
Your "MY NEW LABEL" now is colored.
Now you have a new label and can start putting emails into that label. Next lesson, how to put emails in labels and basic filtering. Stay tuned.